Linux Mint 17.2 on Asus Z87-Pro – Retrieving fan information

I recently built a new computer using an Asus Z87-Pro motherboard and installed Linux Mint 17.2 Cinnamon on it.

Disclaimer: I’m fairly new to Linux.

Mint worked fine out of the box except that running the sensors command at the terminal showed only CPU temperatures and no fans RPM. I really wanted to be able to monitor the hardware since it was a new computer built.

It turns out that the version of the Linux kernel I have does not have a driver that recognizes the “super I/O chip” used on this motherboard. The newer version of the kernel has the driver built-in so this workaround shouldn’t be necessary for to long.

To solve the problem: Go to http://roeck-us.net/linux/drivers/ and download the tar archive for “New driver for NCT6775F, NCT6776F, and NCT6779D (more functionality)”.

Untar the archive and, from the terminal, navigate to the nctd6775-master folder it created. Then run:

sudo make all
sudo make install
sudo modprobe nct6775

Then run sensors and you should see a lot more information than before.

Note that you’ll have to run sudo modprobe nct6775 everytime you reboot. To have it run automatically, add modprobe nct6775 to the /etc/rc.local file and copy the nct6775.ko file to /lib/modules/3.16.0-38-generic (in my case, your version might be different).

How to restore Administrators’ access to redirected My Documents folders

If you followed Microsoft’s Best practices for Folder Redirection, you accepted the default settings and allowed the system to create the folders.

The problem is that by default, the Grant the user exclusive rights to My Documents check box is selected, with the following consequence (quote from the Technet library article about folder redirection):

If you select this check box, the user and the local system have full control over the folder, and no one else, not even the administrator, has any rights to it. If you clear this check box, no changes are made to the permissions on the folder. Whatever permissions are in effect by default remain in effect.

This means that if you already have a bunch of existing redirected My Documents folders set up that way and that you need to access them, you are out of luck. The only documented way to regain access to the folders is to take ownership of each individual folder and manually edit the permissions to give the Administrators group full control. I found a better way.

Note that if you are just setting up folder redirection and want to make sure that administrators will have access to the folders, follow the steps listed in the following article: Enabling the administrator to have access to redirected folders. For everybody else, read on.

The trick is to realize that the local system account has full control over the folder and that PsExec allows you to run commands using that account (using the -s switch). So, if the command in question happens to be a PowerShell script that gives full control to a group you belong to, the problem is solved!

Here is what you need to do:

1. Download and install PsExec and PowerShell. PowerShell needs to be installed on the computer (probably a server) hosting the redirected folders.

2. Edit the $StartingDir and $Principal variables in the following script to match your environment. $StartingDir should be the path to the shared folder that contains all you users redirected My Documents folders, $Principal is the name of the local user or local group that should be granted the permission. It has to be a local account because the script will be run using the local system account, which doesn’t know about domain accounts. We’ll add domain users and/or groups later (step 4).

#ChangePermissions.ps1
# CACLS rights are usually
# F = FullControl
# C = Change
# R = Readonly
# W = Write

$StartingDir= "C:\Users"

$Principal="Administrators"

$Permission="F"

$Verify=Read-Host `n "You are about to change permissions on all" `
"files starting at"$StartingDir.ToUpper() `n "for security"`
"principal"$Principal.ToUpper() `
"with new right of"$Permission.ToUpper()"."`n `
"Do you want to continue? [Y,N]"

if ($Verify -eq "Y") {

foreach ($file in $(Get-ChildItem $StartingDir -recurse)) {
#display filename and old permissions
write-Host -foregroundcolor Yellow $file.FullName
#uncomment if you want to see old permissions
#CACLS $file.FullName

#ADD new permission with CACLS
CACLS $file.FullName /E /P "${Principal}:${Permission}" >$NULL

#display new permissions
Write-Host -foregroundcolor Green "New Permissions"
CACLS $file.FullName
}
}

Note: This script is a simplified version of Don Jones’ script found here: http://technet.microsoft.com/en-us/magazine/2008.02.powershell.aspx. Check it out for more options.

3. Now, we need to run the above script using PsExec using the local system account. Note that the command line shown will run PsExec on the current computer and that the -noexit switch will prevent PowerShell from closing when the script terminates, so you get a chance to read the output.

Here is what you need to type at the command prompt (changing the paths and file names to match your environment):

>psexec -s -i powershell -noexit "& 'C:\Path\To\ChangePermissions.ps1'"

The -i switch will make the PowerShell window visible on the Desktop. If you use Remote Desktop to connect to your server, make sure that you connect to the console or you won’t see any output.

4. Now that the local Administrators group has full control on all files and folders (and I am assuming that you are a member of the local Administrator group), you can run the script again as yourself  (remove the -s switch) to give domain users and groups full control, using the domain\user or domain\group format for the $Principal variable.

5. Done!

How to programmatically set the processor affinity of an application – Updated

A few months back I wrote a post explaining how to set the processor affinity of an application using a little free utility called process.exe. Soon after, our new antivirus software (NOD32) flagged process.exe as a threat, removed it, and prevented me from reinstalling it. I had to look for another solution and discovered Microsoft Application Compatibility Toolkit 5.0.

As an example, I’ll show you how to set the processor affinity of Microsoft Word to force it to use only 1 processor on a dual core system:

1. Download and install Microsoft Application Compatibility Toolkit 5.0 (you need Application Compatibility Toolkit.msi)

2. Go to Start>Programs>Microsoft Application Compatibility Toolkit 5.0 and click on Compatibility Administrator. The following window appears (click to enlarge):

Compatibility Administrator window


3. Right-click on New Database(1)[Untitled_1] and select Create New>Application Fix:

Application Fix


4. Complete the Program information page and click Next. Note that the name of the program and the name of the vendor can be anything you want, only the path to the exe has to be exact:

Create new Application Fix


5. Because we are only interested in setting the processor affinity, select None on the Compatibility Modes page and then click Next:

Compatibility Modes


6. This is the page we are interested in. Scroll down to select SingleProcAffinity in the list of compatibility fixes, then click Next:

Create new Application Fix


7. Do not change any settings on the last page unless you know what you are doing. Just click Finish:

Create new Application Fix


8. Click on File>Save. First give a name to your database:

Save Database

Then save the actual database file:

Save Database file


9. Finally, install the fix by right-clicking the name of your database and selecting Install:

Install Fix


10. Done! You can now close the Compatibility Administrator. Next time you launch Word, it will only use one CPU.

How to add SATA drivers offline to a WIM image of Windows XP

I have been using ImageX to create WIM images of Windows XP for some time now. After imaging a Toshiba A9 laptop with an image created on a Toshiba A8, Windows XP failed to boot, displaying instead the dreaded Stop Error 0x0000007B INACCESSIBLE_BOOT_DEVICE. To quote the Microsoft knowledge base article: “This error may occur if the registry entries and the drivers for the mass storage controller hardware in the backup computer are not installed in Windows XP.” In other words, Windows doesn’t have the SATA drivers needed to communicate with the hard disk. The next step is usually to:

  1. Download the necessary drivers
  2. Copy the drivers to a floppy disk
  3. Run a repair install of XP
  4. Press F6 when prompted during Setup to install the drivers
  5. Run Sysprep
  6. Recapture an image that will now have the necessary drivers installed

This time however, I decided to take advantage of ImageX’s ability to easily mount a WIM image for offline editing. So here is what I did (be aware that this is a hack, it worked for me but there’s no guarantee that it’ll work for you):

  1. Downloaded and extracted the needed SATA drivers from the Toshiba website. The archive contains 6 files: iaahci.cat, iaahci.inf, iastor.cat, iastor.inf, iaStor.sys, and TXTSETUP.OEM.
  2. Mounted the WIM image of Windows XP to an empty folder (C:\Mount) using the command:
    imagex /mountrw C:\PathToYourWIMImage\WindowsXP.wim 1 C:\Mount
  3. Followed the instructions on this thread to copy the driver files where they belong:
    • Copied the .inf files (iaahci.inf and iastor.inf) to C:\Mount\Windows\inf
    • Copied the .sys file (iaStor.sys) to C:\Mount\Windows\system32\drivers
    • Copied all remaining files (iaahci.cat, iastor.cat, iaStor.sys, and TXTSETUP.OEM) to C:\Mount\Windows\system32

    • Loaded the HKEY_LOCAL_MACHINE\SYSTEM hive of the mounted image in the registry:
      • Opened the Registry Editor (type regedit at the command prompt)
      • Selected the HKEY_LOCAL_MACHINE hive
      • Clicked on File>Load Hive and selected C:\Mount\Windows\system32\config\system
      • Named the loaded hive Temp (it can be named anything you want)
    • In Notepad, created a .reg file (SATA_Keys.reg for example) to import the appropriate settings into the mounted hive (click on the picture to download SATA_Keys.doc that you’ll have to rename SATA_Keys.reg):
    Registry File

    How do you come up with this file? Well again, this thread helped a lot, as did that one.  Basically you have to open the .inf files (iaahci.inf and iastor.inf) and locate:

    • the ClassGUID entry in the [version] section.
    • the PCI\VEN entries in the [ControlFlags] section
    • the AddService value in the [iaStor_Inst.Services] section in this case.

    If you look back at the .reg file, you’ll notice that the first 6 keys, derived from iaahci.inf, all have the same ClassGUID, only the PCI\VEN values change. The next 6, derived from the other .inf file (iastor.inf), share a different ClassGUID. Finally, both .inf files refer to the same service (iaStor) which has to be added. Note that in this example, the hexadecimal value of ImagePath means “system32\drivers\iaStor.sys”.

    6.   Double-clicked the .reg file to merge the settings in the registry

    7.   Unloaded the Temp hive (File>Unload Hive)

    8.   Unmounted the WIM image without forgetting the /commit switch (or all the changes would be lost):

    imagex /unmount C:\Mount /commit

    9.   Reimaged the laptop which booted just fine and installed the SATA drivers from within the OS to ensure proper installation.

    How to programmatically set the processor affinity of an application

    One of the user I support runs an older CAD application that doesn’t work properly on computers using a dual core processor. It creates ghosting artifacts when he draws and eventually crashes the application. The trick is to limit the application’s process to only one processor (or one core). To do it manually:

    1. Launch the application
    2. Locate the application’s process in the Task Manager (type taskmgr from the Run command or press Ctrl+Alt+Delete)
    3. Right-click on the process and select Set Affinity
    4. Uncheck all the selected CPUs except one.

    It works well, but it needs to be done every time the application is launched.

    To do it automatically, I downloaded a free command line utility from a company called Beyond Logic: process.exe. To have a process named ExampleAppProcess.exe use only CPU 1, type:

    process -a ExampleAppProcess.exe 01

    So, I copied process.exe in a folder and added the path to this folder to the PATH environment variable. Then, I opened Notepad and typed:

    cd c:\Program Files\ExampleAppFolder
    start ExampleApp.exe
    process -a ExampleAppProcess.exe 01

    I saved this file as Affinity.cmd and added a shortcut to it on the Desktop. I changed the name and the icon of the shortcut to match the one used by the original application, and then deleted the original shortcut.

    Now my user doesn’t have to do anything special: He double-clicks on what appears the be the same shortcut as before, but now his application works.

    How to launch Outlook Express from the command line

    Even if you “uninstall” Outlook Express via Add/Remove Windows Components (type control appwiz.cpl,,2 at the command prompt), it is still very much installed. The icons and shortcuts pointing to it are gone but you can still easily launch Outlook Express by typing msimn at the command line.

    More info here: OLEXP: Command Line Options for Outlook Express

    Also, the site to go to for everything Outlook Express: Inside Outlook Express

    How to non-destructively convert dynamic disks to basic disks

    The official method to convert dynamic disks back to basic disks is to back up the data, format the disks, and finally restore the data from backup. See Microsoft’s instructions on how to do that here.

    Of course, nobody wants to do that, and sometimes it’s not even possible to implement this method. It assumes that you can boot up the computer or at least access the drives and back up the data in the first place. So what are the other options?

    Well, I unfortunately had to look for another solution last week when my computer refused to recognize any of my 4 dynamic hard drives. Here are the results of my search:

    1. Use TestDisk. If you want to know why and how, keep reading or jump to the conclusion section.

    2. If you are lucky enough to be able to boot, follow Microsoft’s own instructions to avoid the backup/format/restore method.
    Note: Ignore the title of this knowledge base article and go straight to the WORKAROUND section.

    Detailed instructions with screen shots can be found on thelazyadmin.com blog.

    3. If your computer won’t boot, read on.

    After installing the free VMWare server 1.0.2 and loading Vista Ultimate Edition as a virtual machine on my Windows XP Pro machine, my computer wouldn’t boot in any mode. Last Know Good Configuration didn’t change anything, and a repair install was not an option as neither Setup nor the recovery console were able to detect the Windows installation. Running the map command from the recovery console listed all my drives but they all had question marks instead of the expected drive letters. bootcfg /scan didn’t find anything. ERD Commander couldn’t help either (no Windows installation detected). I wasn’t even able to mount the drives using a Linux live CD.

    My next step was to buy an external enclosure for my SATA drives (Vantec NexStar 3, works great) to backup the data from a working computer. When dynamic disks are connected to a computer running XP or Vista, they show up as Foreign in the Disk Management console (diskmgmt.msc). All you have to do is right-click the drive and select Import Foreign Disk. Except this time it didn’t work, and instead I received 2 error messages back to back:

    INTERNAL Error – The disk group contains no valid configurations copies (C10000B6)

    followed by

    Unspecified error (80004005)

    Looking up these error messages didn’t lead to anything useful so I decided to give up on the dynamic disk to basic disk conversion topic and started to search for data recovery software. That’s how I found TestDisk.

    I ran TestDisk on a XP Pro laptop, it detected my USB-connected “foreign” drive, found all my “partitions” (dynamic disk volumes), allowed me to backup my data to the laptop, and offered the option to write a new partition table based on what it had found. I did just that, securely removed the USB enclosure, plugged it back and voila! My laptop detected a new basic disk, with partitions instead of volumes, drive letters, and best of all, all my data intact.
    I was then able to reinstall the drive in my computer, repair Windows and from there run TestDisk on the three remaining drives so I can confirm that it works for external (USB) drives, IDE drives and SATA drives.

    Conclusion:

    TestDisk 6.6 will allow to backup your data and, if you let it rewrite the partition stucture, it will convert your dynamic disk to a basic disk without touching the data.

    Run TestDisk:

    TestDisk

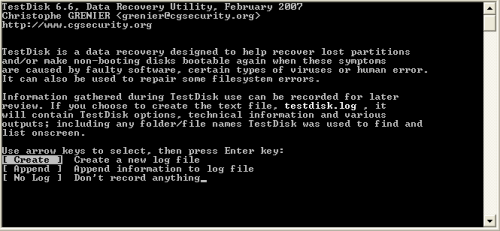
    Select Create to log information.

    TestDisk

    The program detects all the drives connected to your computer (internal, external, Flash drives).
    Highlight the one you want to work on, select Proceed and press Enter.

    TestDisk

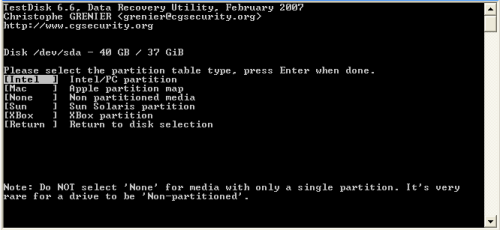
    Make the appropriate choice for your computer and press Enter.

    TestDisk

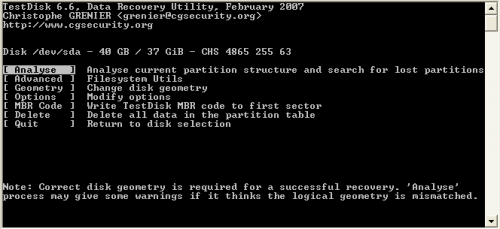
    Select Analyse and press Enter.

    TestDisk

    It displays the current structure. Select Backup first, then Proceed. Backing up first is a good idea if you later want to restore the drive’s partition structure.

    TestDisk

    It might take a while to get to that screen if your drive is having problems, but eventually, it’ll display all the partitions it found. Select a partition and press P if you want to see the files stored on that particular partition, then press c to copy the files to the folder TestDisk is running from any available drive with enough free space. [Thanks to commenter Bob Janes for pointing out to me that it is indeed possible to backup your data anywhere you wish]

    Press Enter to continue.

    TestDisk

    This is where you can make the dynamic to basic drive conversion happen. Select Write, then press Y to confirm that you want to write the new partition structure to disk.
    Quit the program, reboot the drive you just modified and enjoy your new basic drive.

    Shortcuts to open Control Panel applets

    To launch a Control Panel applet from the Run command, you just need to know its name:

    Type To launch
    ncpa.cpl Network Connections
    appwiz.cpl Add or Remove Programs
    inetcpl.cpl Internet Properties
    sysdm.cpl System Properties
    control printers Printers and Faxes
    mmsys.cpl Sound and Audio Devices Properties

    The above list is not exhaustive. There are many more applets that can be launched in the same way; I listed the ones I use the most. The applets are .cpl files located in the %windir%\system32 folder.

    If .cpl files are not associated to the control.exe application, you’ll need to type control name.cpl to launch the applet.

    It is possible to pass arguments when launching an applet in order to select a particular page and/or tab. For example, typing control inetcpl.cpl,,4 will open the Internet Properties applet with the 5th tab already selected (the index is 0-based). Typing control is mandatory if you want to pass arguments.

    For detailed info and a more complete list of available applets, check out these resources:

    www.geekgirls.com

    vlaurie.com

    Keep Windows on time with the built-in Windows Time service

    I had to keep a W2K machine on time as its main job is to control clocks in different locations. It turns out that Windows as a built-in SNTP client that can be set to retrieve the time from public SNTP servers.

    The idea is to give Windows a list of time servers to check and then restart the Windows Time service for the change to take effect.

    So, first you need a list of available SNTP time servers.

    Then, you use the net time command to enter a list of time servers, e.g.:

    C:\>net time /setsntp:"ns.scruz.net ntp.ucsd.edu ntp1.mainecoon.com"

    Finally, you restart the Windows Time service:

    C:\>net stop W32Time
    C:\>net stop W32Time

    How to deal with “CMD does not support UNC paths as current directories“

    The solution is to use pushd instead of cd to change the current directory to a share accessed via a UNC path (e.g.: >pushd \\myserver\myshare).
    Use popd when done.

    More info on the Microsoft Web site.